![[Alt]](../Images/Keyboard/KeyAlt.gif) +
+![[Enter]](../Images/Keyboard/KeyEnter.gif) , if you wish, but is not a requirement.
, if you wish, but is not a requirement.Whereas the wonderfully fortunate children born in Israel to Jewish families get to learn Hebrew as their first language from mom and dad, friends, neighbors and TV, with current technology it is possible to learn it in the diaspora with a bit of help from computers.
Since this limited program focuses in reading and writing, both secondary skills to listening and speaking. We arranged to introduce them first, for this external resources will be used, in addition to our basic text based aids, such we'll keep minimal to avoid distraction from the development of those primary skills.
We include links to You-Tube videos with pronunciation of songs, and short dialog, also printable sheets with minimal, to avoid distraction, help. For this we'll use Hatikvah. The Israel national anthem, and Disney movies sing-along songs. This should suffice for the drilling in mind of the sound-letter relation, and introduce a bit to verbs, nouns and declension, due to been this a more natural way to learn a language. This material is not meant towards children, you are free to use it with your children if you approve of course, but it's real purpose is to make it easy, accessible and engaging. Please don't be ashamed; as a grown up this should take you a short time.
Learn every word directly, as you hear or pronounce it imagine the being, thing, feeling or action meant, don't think at first about spelling or the translated equivalent in your first language: Learn it directly, just like children learn their first language.
Here are the links to the printable material, and the video-sound. Fold the printable material as shown. For this primary skills use the hidden text just to learn every word meaning, later as help for reading, but not yet, soon you won't need to look the sheet of paper, learning direct is best. So download this program, and follow this links:
Sing along songIf your internet is slow, seek back to the start as you need, make it loop, download or record the sound, so you can listen to it and see the printed material enough times to get to learn it.
We hope this program will be helpful in learning Hebrew, since it doesn't have a true method, we recommend to use it along with another organized and systematic learning program like FoundationStone, DuoLingo or Hebrew101 that we recommend to follow.
We believe the strengths of this program are for very beginners learning the Hebrew alphabet, the Israeli keyboard, and for intermediate level our most advanced and demanding feature the Coincide many words game. So the suggested plan is: Use this program to learn the Hebrew alphabet; get to Foundation Stone, DuoLingo, HebrewPod101 to learn more, and when you are at intermediate level, come back to this program to also increase and challenge your vocabulary with the coincide many words game such finally can process typing, while still using those organized methods. You don't need this program to learn the Israeli keyboard or any foreign language keyboard for that matter, see the General trick for learning any keyboard.
If you run this program under Windows 95 or previous versions this will make a difference. In Windows XP, 98, 95 and DOS is very important to set FULL SCREEN mode BEFORE selecting the font. If you are running Lists.EXE inside DosBox simulator please disregard the message about Full Screen. You can still get to full screen in DosBox by pressing ![[Alt]](../Images/Keyboard/KeyAlt.gif) +
+![[Enter]](../Images/Keyboard/KeyEnter.gif) , if you wish, but is not a requirement.
, if you wish, but is not a requirement.
The program asks for you to select one of four fonts, this won't change the text whatsoever, just the way you see Hebrew in screen.
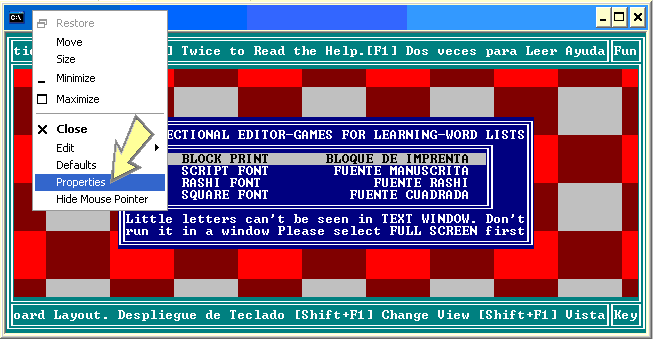
To select FULL SCREEN MODE: Right Click on top of the Text Window. Choose PROPERTIES, There DISPLAY. And FULL SCREEN, press OK and Apply properties to current window only:
Right click in the upper section of the D.O.S. Text Window and select PROPERTIES
Right click on top & Properties
In the OPTIONS tab go to the DISPLAY section and choose FULL SCREEN.
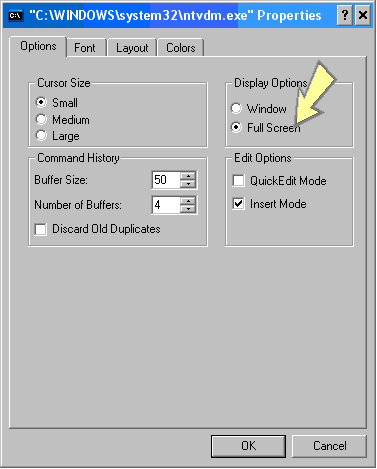
Options & Display & FULL SCREEN
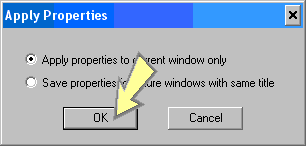
Chose Apply properties to current window only ratio button and press OK again.
WINDOWS 7© and newer, MAC©, Linux©, Unix© and other systems: It is still possible to run this 8 bit application. You may want to download also DOSBox from its official site.
Inside the DosBox© window You'll need to MOUNT the directory where YOU HAVE EXTRACTED the ZIP file. For instance C:\Lists. Just need to write:
Mount C: C:\Lists![[Enter]](../Images/Keyboard/KeyEnter.gif) C:
C:![[Enter]](../Images/Keyboard/KeyEnter.gif) Lists
Lists![[Enter]](../Images/Keyboard/KeyEnter.gif) .
.
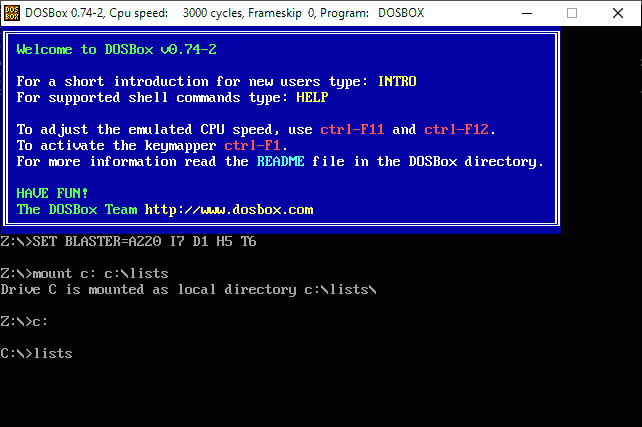
In DosBox press ![[Ctrl]](../Images/Keyboard/KeyCtrl.gif) +
+![[F10]](../Images/Keyboard/KeyF10.gif) to capture or release the mouse. You can also get the mouse arrow out by pressing the
to capture or release the mouse. You can also get the mouse arrow out by pressing the ![[Windows]](../Images/Keyboard/KeyWin.gif) © key**.
© key**. ![[Alt]](../Images/Keyboard/KeyAlt.gif) +
+![[Enter]](../Images/Keyboard/KeyEnter.gif) will get into or exit Full Screen mode, please press the RIGHT
will get into or exit Full Screen mode, please press the RIGHT ![[Ctrl]](../Images/Keyboard/KeyCtrl.gif) key for keyboard combinations, the LEFT
key for keyboard combinations, the LEFT ![[Ctrl]](../Images/Keyboard/KeyCtrl.gif) key seems to be captured before the program running inside the simulator gets it. This program does not include sound.
key seems to be captured before the program running inside the simulator gets it. This program does not include sound.
To exit press ![[Esc]](../Images/Keyboard/KeyEsc.gif) or
or ![[Alt]](../Images/Keyboard/KeyAlt.gif) +
+![[F4]](../Images/Keyboard/KeyF4.gif) .
.
**Windows© is property of Microsoft. Mac© is property of Macintosh. DOSBox© is property of it's Development Team.
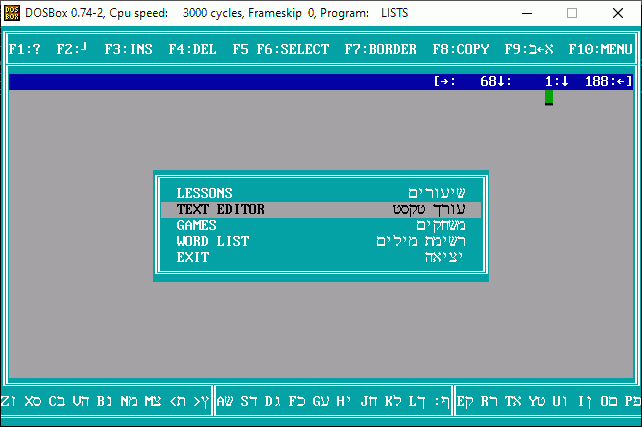
This is the font menu, the first thing this program will show.
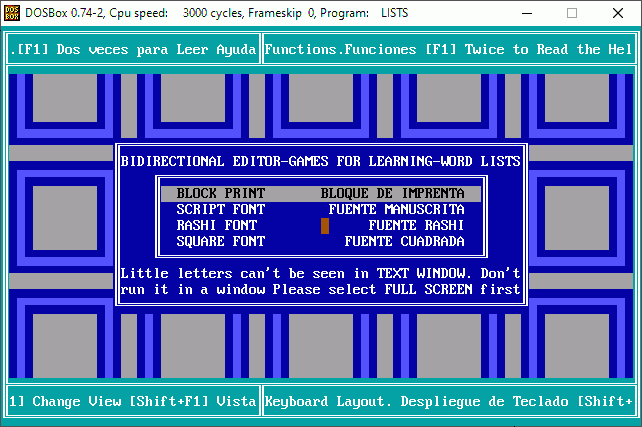
Again if you are using DOSBox simulator disregard the full screen message.
In order for the Text Editor, Games and Word List to work two files are required: Lists.EXE and HEBREW.MIL. If there is only Lists.EXE then an error message is shown because the data bank file is missing.
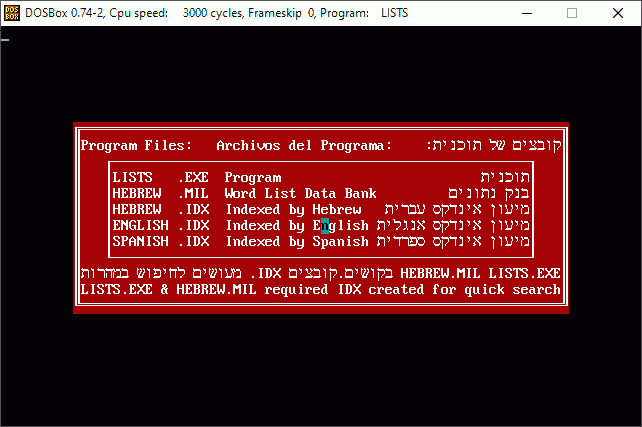
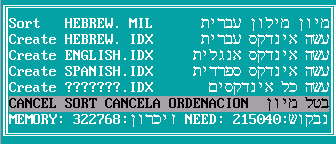
The first time it runs upon not finding the .IDX files the program will create them from the data bank HEBREW.MIL. Sorted alphabetical by Hebrew, English and Spanish: HEBREW.IDX, ENGLISH.IDX and SPANISH.IDX respectively.
However we provide another download ZIP file containing the index files already, in order to save time. But the *.IDX files are not absolutely necessary since they are created from the data bank HEBREW.MIL.
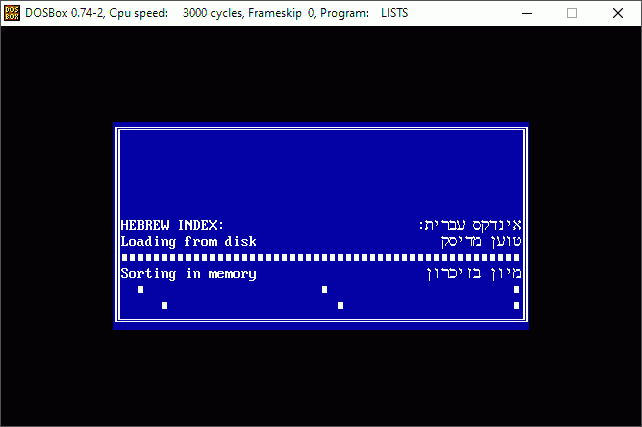
Loading and saving display advance bars, sorting reports a few in screen too. You see this when you sort the index files; to do so is only required if you added or modified several words and want them to be found when searched for, no need to do it for every word. Preferably add and modify all you want, when you are done adding words then sort the data bank and indexes.
In order to improve this program usefulness for learning there is a LESSONS menu as start. Lessons 1 through 5 are divided in two parts: Learn and Test.
In learn mode, the correct match will be shown, and the mouse won't work. If you prefer you may use the flashcards or PRIMARY SKILLS material provided instead, and then test that knowledge on Lessons 1 through 6 in Test mode. It could be said the Stare game is the Learning mode for the coinciding and spelling games. However you know how you learn the most effective way yourself, and can use them as challenging and aiding your memorizing of new vocabulary.
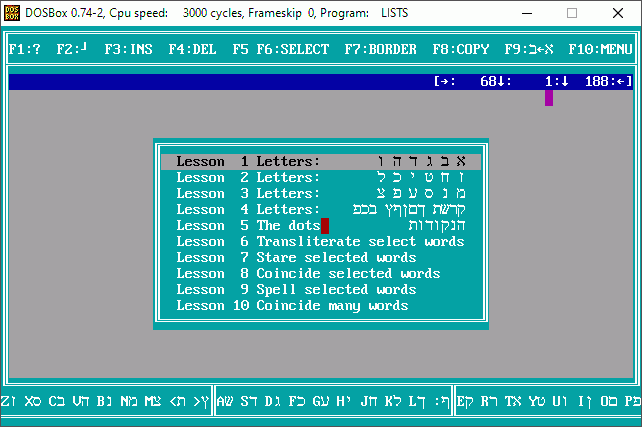
By pressing ![[ESC]](../Images/Keyboard/KeyEsc.gif) in this Lessons menu you can exit to the Text Editor. Press
in this Lessons menu you can exit to the Text Editor. Press ![[ESC]](../Images/Keyboard/KeyEsc.gif) again to get to the Main Menu from there.
again to get to the Main Menu from there.

You can also learn this using the flashcards or the PRIMARY SKILLS material provided, please see the PRIMARY SKILLS section. Transliteration can be turned off in the Transliteration Menu

Lessons 1 to 5 have a Learning Mode.
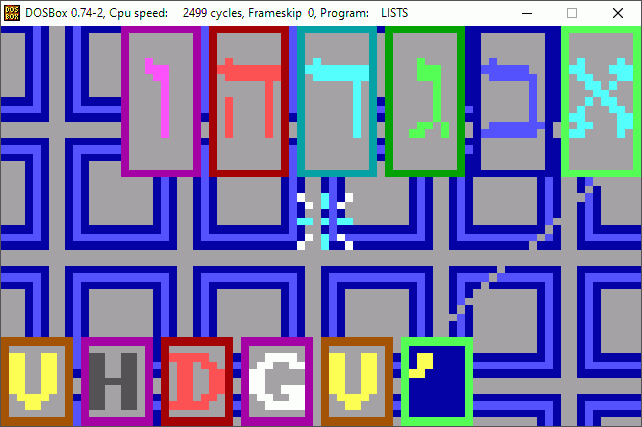
Mouse won't work in Learn Mode. If you wish you can have the letters exit the list as you learn them.
In test mode in addition to the keyboard the mouse will work, English and Hebrew will be shuffled, duplicates will be reduced. The bouncing letters in the background available to drop or drag are a bit of encouragement, and give a sense of hurry. Time, correct and incorrect answers will be counted.
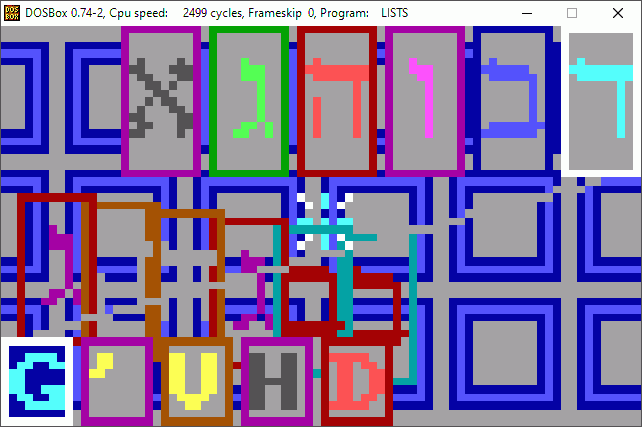
Using ![[Up]](../Images/Keyboard/KeyUp.gif) or
or ![[Dn]](../Images/Keyboard/KeyDn.gif) move to the Hebrew or English rows and select equivalent letters by moving
move to the Hebrew or English rows and select equivalent letters by moving ![[Left]](../Images/Keyboard/KeyLf.gif) or
or ![[Right]](../Images/Keyboard/KeyRg.gif) then press
then press ![[Enter]](../Images/Keyboard/KeyEnter.gif) or
or ![[Space]](../Images/Keyboard/KeySpc.gif) , if your selection is correct they will slide to the middle and get out from the list. You can also use the mouse to drag and drop, or click instead of pressing
, if your selection is correct they will slide to the middle and get out from the list. You can also use the mouse to drag and drop, or click instead of pressing ![[Enter]](../Images/Keyboard/KeyEnter.gif) or
or ![[Space]](../Images/Keyboard/KeySpc.gif) . If the letters don't fit in the screen and you want to hasten your movement, hold
. If the letters don't fit in the screen and you want to hasten your movement, hold ![[Shift]](../Images/Keyboard/KeyShift.gif) while pressing
while pressing ![[Left]](../Images/Keyboard/KeyLf.gif) or
or ![[Right]](../Images/Keyboard/KeyRg.gif) or dragging a letter with the mouse to skip the scrolling.
or dragging a letter with the mouse to skip the scrolling.

Coming from the Lessons menu a special option will be available: Learn [→] [←] [PgUp] [PgDn] [ESC] The transliterations for every letter and vowel in a word will be shown, you can move along with ![[Left]](../Images/Keyboard/KeyLf.gif) or
or ![[Right]](../Images/Keyboard/KeyRg.gif) , and pay attention to which Hebrew letter sounds like which English.
, and pay attention to which Hebrew letter sounds like which English. ![[PgUp]](../Images/Keyboard/KeyPgUp.gif) or
or ![[PgDn]](../Images/Keyboard/KeyPgDn.gif) will take you to the previous and next words. Press
will take you to the previous and next words. Press ![[ESC]](../Images/Keyboard/KeyEsc.gif) to exit. Remember transliteration is the means to the end of reading Hebrew, again in your mind ASSOCIATE SYMBOLS TO SOUNDS.
to exit. Remember transliteration is the means to the end of reading Hebrew, again in your mind ASSOCIATE SYMBOLS TO SOUNDS.
When you are actually transliterating use ![[Up]](../Images/Keyboard/KeyUp.gif) to chose which Hebrew letter you wish to transliterate, as you move along the middle row with
to chose which Hebrew letter you wish to transliterate, as you move along the middle row with ![[Left]](../Images/Keyboard/KeyLf.gif) or
or ![[Right]](../Images/Keyboard/KeyRg.gif) , the top row will also frame the Hebrew letter or vowel corresponding to that space. Use
, the top row will also frame the Hebrew letter or vowel corresponding to that space. Use ![[Dn]](../Images/Keyboard/KeyDn.gif) to go to the English letters, choose from them with
to go to the English letters, choose from them with ![[Left]](../Images/Keyboard/KeyLf.gif) or
or ![[Right]](../Images/Keyboard/KeyRg.gif) the English equivalent of the Hebrew letter; press then
the English equivalent of the Hebrew letter; press then ![[Enter]](../Images/Keyboard/KeyEnter.gif) or
or ![[space]](../Images/Keyboard/KeySpc.gif) , if is correct the empty space will be filled with it. With the mouse you may drag an English letter and drop it over the appropriate Hebrew letter, or drag a Hebrew letter or Nikud and drop it over the appropriate English letter. If you prefer you may type the transliteration as well: Capitals or lowercase won't matter.
, if is correct the empty space will be filled with it. With the mouse you may drag an English letter and drop it over the appropriate Hebrew letter, or drag a Hebrew letter or Nikud and drop it over the appropriate English letter. If you prefer you may type the transliteration as well: Capitals or lowercase won't matter.
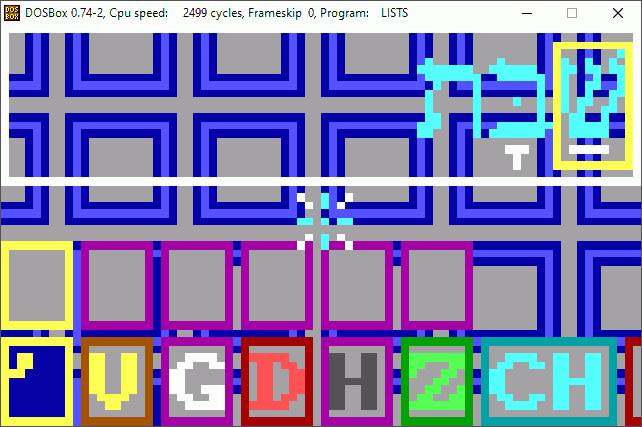
In the first transliteration try: for Shabbath the שׁ transliterates as SH since it has a SHIN dot. For convention in this program when Shin ש doesn't have a SIN שׂ DOT or SHIN שׁ DOT the transliteration is Sh. The next letter BET בּ transliterates as B and not V since it has a dagesh, and is also doubled because this dagesh is forte. And ת is simply T.
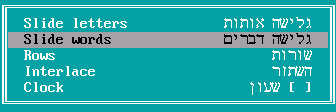
Press ![[Up]](../Images/Keyboard/KeyUp.gif) or
or ![[Dn]](../Images/Keyboard/KeyDn.gif) to see previous or next word.
to see previous or next word.
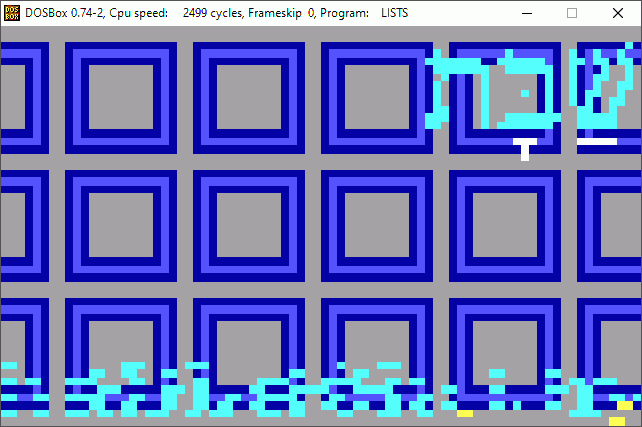
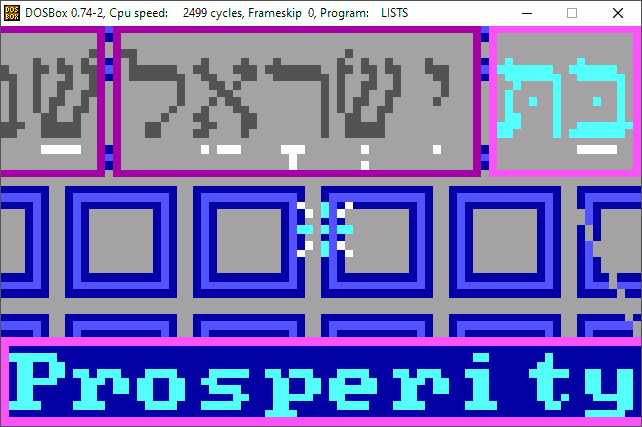
You can also use a mouse click instead of pressing ![[Enter]](../Images/Keyboard/KeyEnter.gif) or
or ![[Space]](../Images/Keyboard/KeySpc.gif) . If you want to hasten your movement, hold
. If you want to hasten your movement, hold ![[Shift]](../Images/Keyboard/KeyShift.gif) while pressing
while pressing ![[Left]](../Images/Keyboard/KeyLf.gif) or
or ![[Right]](../Images/Keyboard/KeyRg.gif) just like in Lessons 1 to 5 or the Coinciding Letters Game.
just like in Lessons 1 to 5 or the Coinciding Letters Game.

The translated word will be displayed once scrolling in the middle of the screen. The bottom row has all the Hebrew Letters to choose from to replace the "?" in the top row. Go to the Word to be spelled with ![[Up]](../Images/Keyboard/KeyUp.gif) , move along the several "?" with
, move along the several "?" with ![[Left]](../Images/Keyboard/KeyLf.gif) or
or ![[Right]](../Images/Keyboard/KeyRg.gif) to replace them with the appropriate Hebrew letter choosing it from the bottom row, going there with
to replace them with the appropriate Hebrew letter choosing it from the bottom row, going there with ![[Dn]](../Images/Keyboard/KeyDn.gif) , and choosing any particular letter by moving with
, and choosing any particular letter by moving with ![[Left]](../Images/Keyboard/KeyLf.gif) or
or ![[Right]](../Images/Keyboard/KeyRg.gif) .
.
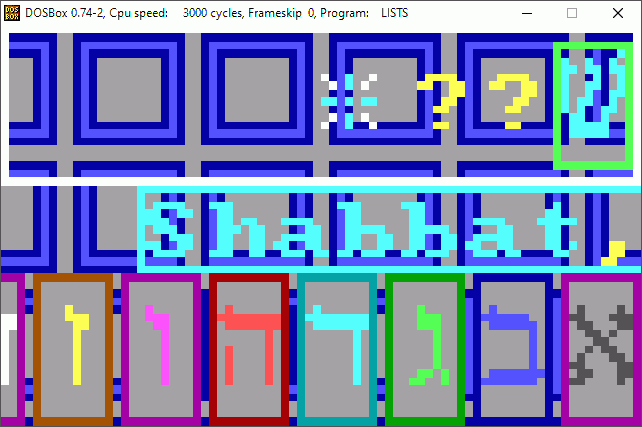
Holding ![[Shift]](../Images/Keyboard/KeyShift.gif) will skip the scrolling to hasten your search. Mouse dragging and dropping works too. Holding
will skip the scrolling to hasten your search. Mouse dragging and dropping works too. Holding ![[Shift]](../Images/Keyboard/KeyShift.gif) skips scrolling hastening the mouse as well when ready to drop. Like in Transliterating you can also type, fill all the "?", move along towards the left by pressing
skips scrolling hastening the mouse as well when ready to drop. Like in Transliterating you can also type, fill all the "?", move along towards the left by pressing ![[Space]](../Images/Keyboard/KeySpc.gif) , the keyboard will work like an Israeli keyboard.
, the keyboard will work like an Israeli keyboard.
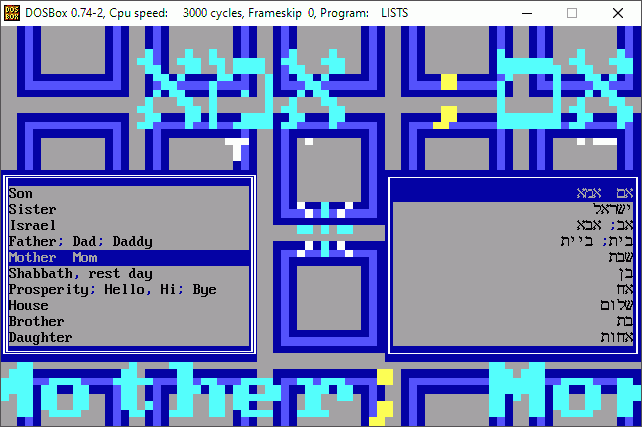
When you get to a more advanced level and choose to have coincidences in the 60s, 70s, or even 100 you may want to learn also the Israeli Keyboard so you can start typing the word you remember to hasten your search for a translation: As you start to write, you will be taken to the closest match, the matching letters will highlight, and you can press ![[Up]](../Images/Keyboard/KeyUp.gif) or
or ![[Dn]](../Images/Keyboard/KeyDn.gif) to get to the next compliant word, your search will be significantly faster, while helping you on keyboard practice. Pressing
to get to the next compliant word, your search will be significantly faster, while helping you on keyboard practice. Pressing ![[Back Space]](../Images/Keyboard/KeyBckSpc.gif) will delete the last letter to search. Pressing
will delete the last letter to search. Pressing ![[Del]](../Images/Keyboard/KeyDel.gif) will clear the search. Moving to the other language list will clear the search too. When the cursor is in the English words the keyboard will be an American, Latin, French. DVORAK as you set, when you are in the Hebrew words the keyboard will be an Israeli keyboard. While having a search if
will clear the search. Moving to the other language list will clear the search too. When the cursor is in the English words the keyboard will be an American, Latin, French. DVORAK as you set, when you are in the Hebrew words the keyboard will be an Israeli keyboard. While having a search if ![[Up]](../Images/Keyboard/KeyUp.gif) or
or ![[Dn]](../Images/Keyboard/KeyDn.gif) advance only one row and won't take you to the next compliant word this means there are no more compliant words up or down from where you are in the list.
advance only one row and won't take you to the next compliant word this means there are no more compliant words up or down from where you are in the list.
Scores:
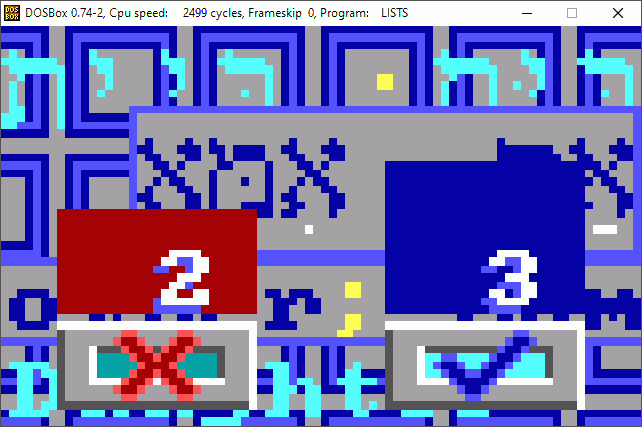
When you exit a game the score will be shown: A count of the correct and incorrect answers.
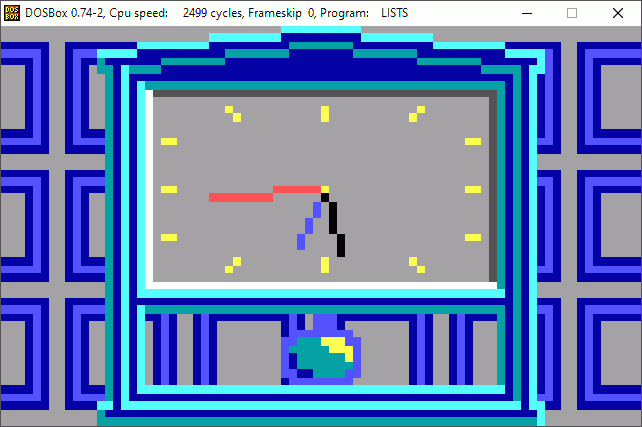
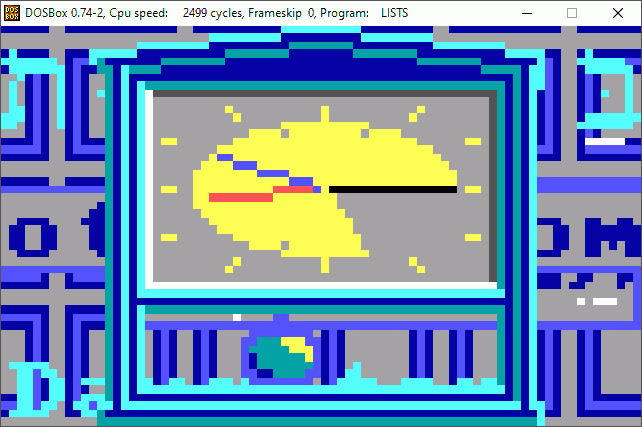
How long it took: Here the seconds hand of the clock is just leaving a 3/4 circle.
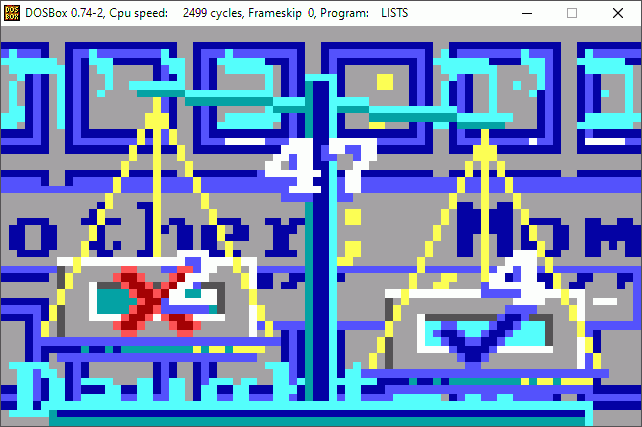
And will be then compared in a scale. In this example in 47 seconds got 4 correct answers and 2 incorrect.
To exit the lessons please press ![[ESC]](../Images/Keyboard/KeyEsc.gif) , will exit to the Text Editor which was the old start of the program. From there you can get to the Games and Word List by going to the Text Editor Menu by pressing
, will exit to the Text Editor which was the old start of the program. From there you can get to the Games and Word List by going to the Text Editor Menu by pressing ![[F10]](../Images/Keyboard/KeyF10.gif) . To exit press
. To exit press ![[Alt]](../Images/Keyboard/KeyAlt.gif) +
+![[F4]](../Images/Keyboard/KeyF4.gif) . To get back to the Main Menu press
. To get back to the Main Menu press ![[ESC]](../Images/Keyboard/KeyEsc.gif) .
.
To get there just press ![[ESC]](../Images/Keyboard/KeyEsc.gif) in the initial landing Lessons menu. This will exit to the Text Editor. There press
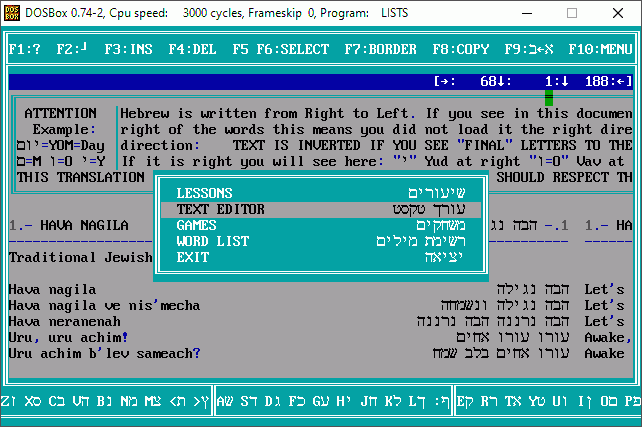
in the initial landing Lessons menu. This will exit to the Text Editor. There press ![[ESC]](../Images/Keyboard/KeyEsc.gif) again. The Main Menu has this options: Lessons, Text Editor, Games, Word List, and Exit.
again. The Main Menu has this options: Lessons, Text Editor, Games, Word List, and Exit.
![[F9]](../Images/Keyboard/KeyF9.gif) to change between typing English and Hebrew or Western and Israeli keyboards.
to change between typing English and Hebrew or Western and Israeli keyboards.
![[Ctrl]](../Images/Keyboard/KeyCtrl.gif) +
+![[Enter]](../Images/Keyboard/KeyEnter.gif) or [Right Click] away from the Text Editor.
or [Right Click] away from the Text Editor.
![[Alt]](../Images/Keyboard/KeyAlt.gif) +
+![[F4]](../Images/Keyboard/KeyF4.gif)
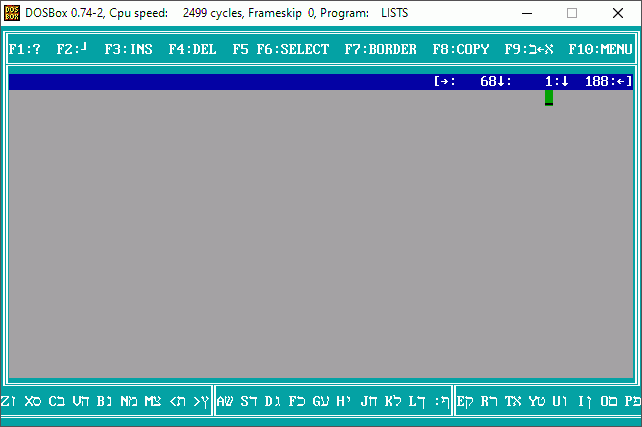
We hope this program will help in your Hebrew learning by having a word list, and games for transliteration, matching words and spelling. Finally a start up landing Lessons menu was made in order to be more methodical.
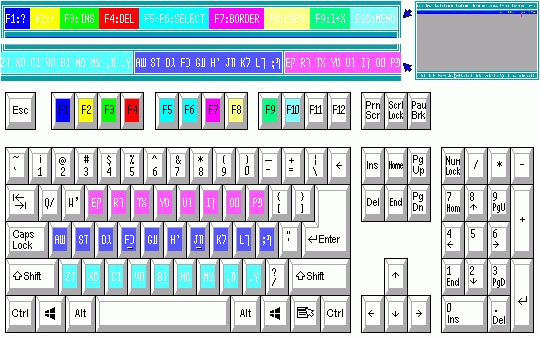
Remember the lower help displays a keyboard layout map, not letter equivalences. This is the relationship between the help displayed and the keyboard:
![[F1]](../Images/Keyboard/KeyF1.gif) Will display the keyboard layout. Here you can use mouse or keyboard arrows to choose a letter to type, press
Will display the keyboard layout. Here you can use mouse or keyboard arrows to choose a letter to type, press ![[Left]](../Images/Keyboard/KeyLf.gif) or
or ![[Right]](../Images/Keyboard/KeyRg.gif) it will display in alphabetical order the letters English or Hebrew, while you move along with
it will display in alphabetical order the letters English or Hebrew, while you move along with ![[Left]](../Images/Keyboard/KeyLf.gif) or
or ![[Right]](../Images/Keyboard/KeyRg.gif) will highlight it's location in the keyboard, press
will highlight it's location in the keyboard, press ![[Enter]](../Images/Keyboard/KeyEnter.gif) to have it typed. Press
to have it typed. Press ![[Up]](../Images/Keyboard/KeyUp.gif) to get into the keyboard, will highlight the alphabetical ordered letter as well.
to get into the keyboard, will highlight the alphabetical ordered letter as well.
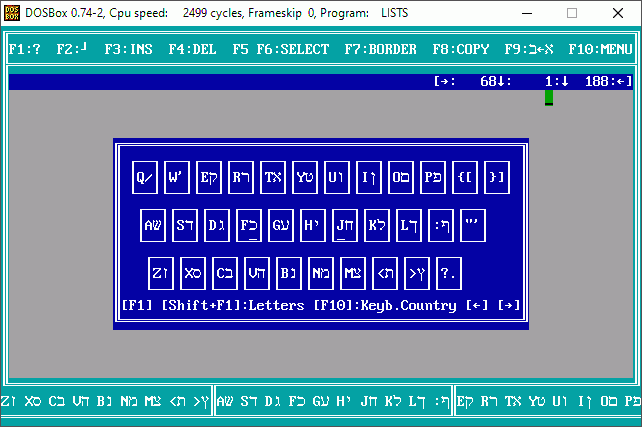
In the Keyboard help ![[F10]](../Images/Keyboard/KeyF10.gif) selects an international keyboard, it even supports DVORAK. You can also define your own.
selects an international keyboard, it even supports DVORAK. You can also define your own.
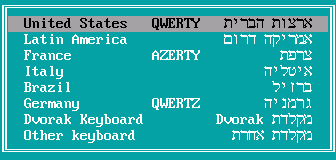
Press ![[F1]](../Images/Keyboard/KeyF1.gif) again to get to the Help text.
again to get to the Help text.
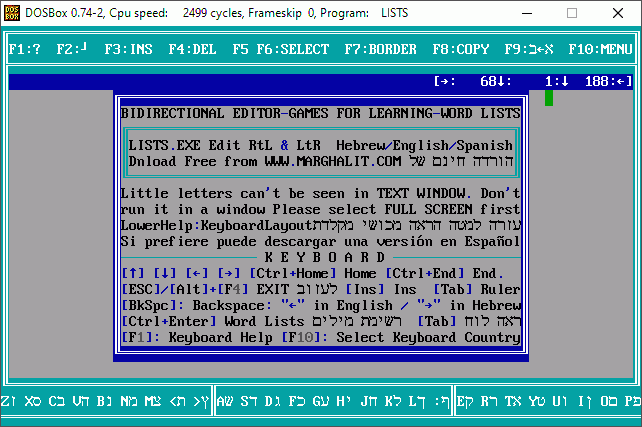
![[F2]](../Images/Keyboard/KeyF2.gif) Will let you draw lines following the cursor movement. Old text editors did it, not practical use for it, the Flip selection option in the Selected Text menu in the Text Editor Menu flips this lines. A menu will let you select the kind of lines, see
Will let you draw lines following the cursor movement. Old text editors did it, not practical use for it, the Flip selection option in the Selected Text menu in the Text Editor Menu flips this lines. A menu will let you select the kind of lines, see ![[F7]](../Images/Keyboard/KeyF7.gif) .
.
![[F3]](../Images/Keyboard/KeyF3.gif) Inserts a row in the text.
Inserts a row in the text.
![[F4]](../Images/Keyboard/KeyF4.gif) Deletes a row in the text.
Deletes a row in the text.
![[F5]](../Images/Keyboard/KeyF5.gif) Sets the left-top corner of a selection in the text at the cursor location.
Sets the left-top corner of a selection in the text at the cursor location.
![[F6]](../Images/Keyboard/KeyF6.gif) Sets the right-bottom corner of a selection in the text at the cursor location.
Sets the right-bottom corner of a selection in the text at the cursor location.
![[F7]](../Images/Keyboard/KeyF7.gif) Makes a border on the selection in the text. Prompts a menu to choose different borders like simple or double vertical and or horizontal lines, like the line drawing option, see
Makes a border on the selection in the text. Prompts a menu to choose different borders like simple or double vertical and or horizontal lines, like the line drawing option, see ![[F2]](../Images/Keyboard/KeyF2.gif) .
.
![[F8]](../Images/Keyboard/KeyF8.gif) Will copy at the cursor location the whole selection rectangle defined by
Will copy at the cursor location the whole selection rectangle defined by ![[F5]](../Images/Keyboard/KeyF5.gif) -
-![[F6]](../Images/Keyboard/KeyF6.gif) . Will copy from cursor to the left if typing Hebrew, or to the right if typing English, see
. Will copy from cursor to the left if typing Hebrew, or to the right if typing English, see ![[F9]](../Images/Keyboard/KeyF9.gif) .
.
![[F9]](../Images/Keyboard/KeyF9.gif) Will flip between typing English and Hebrew or using an American and Israeli keyboard. This is the view of it when writing Hebrew or English
Will flip between typing English and Hebrew or using an American and Israeli keyboard. This is the view of it when writing Hebrew or English


![[Shift]](../Images/Keyboard/KeyShift.gif) +
+![[F1]](../Images/Keyboard/KeyF1.gif) Changes the display of the lower help when set to keyboard: Will display English letters, Hebrew letters, none or both. Also changes the scrolling speed when the upper or lower help is a vocabulary.
Changes the display of the lower help when set to keyboard: Will display English letters, Hebrew letters, none or both. Also changes the scrolling speed when the upper or lower help is a vocabulary.
![[Shift]](../Images/Keyboard/KeyShift.gif) +
+![[F9]](../Images/Keyboard/KeyF9.gif) Displays information and encoding of the text file.
Displays information and encoding of the text file.
![[F10]](../Images/Keyboard/KeyF10.gif) Will get you to the Text Editor Menu.
Will get you to the Text Editor Menu.
![[Shift]](../Images/Keyboard/KeyShift.gif) +
+![[F10]](../Images/Keyboard/KeyF10.gif) Will get you to the Text Editor Menu with special options. The Data Bank option, Load from and Save to Encoding options. See Data Bank. See Encoding.
Will get you to the Text Editor Menu with special options. The Data Bank option, Load from and Save to Encoding options. See Data Bank. See Encoding.
![[Shift]](../Images/Keyboard/KeyShift.gif) +
+![[Up]](../Images/Keyboard/KeyUp.gif)
![[Dn]](../Images/Keyboard/KeyDn.gif)
![[Left]](../Images/Keyboard/KeyLf.gif)
![[Right]](../Images/Keyboard/KeyRg.gif) Will "paint" a block of selected text, like
Will "paint" a block of selected text, like ![[F5]](../Images/Keyboard/KeyF5.gif) -
-![[F6]](../Images/Keyboard/KeyF6.gif) do. Holding and moving the mouse does as well.
do. Holding and moving the mouse does as well.
![[Ctrl]](../Images/Keyboard/KeyCtrl.gif) +
+![[C]](../Images/Keyboard/KeyC.gif) Will copy to the clipboard a selection if this consists of a single line in the text.
Will copy to the clipboard a selection if this consists of a single line in the text.
![[Ctrl]](../Images/Keyboard/KeyCtrl.gif) +
+![[X]](../Images/Keyboard/KeyX.gif) Will copy to the clipboard and cut a selection if this consists of a single line in the text.
Will copy to the clipboard and cut a selection if this consists of a single line in the text.
![[Ctrl]](../Images/Keyboard/KeyCtrl.gif) +
+![[V]](../Images/Keyboard/KeyV.gif) Will paste the clipboard into the text.
Will paste the clipboard into the text.
![[Ctrl]](../Images/Keyboard/KeyCtrl.gif) +
+![[F]](../Images/Keyboard/KeyF.gif) Will find something in the text document. Be sure to have set English or Hebrew before this in order to type what you want to search for.
Will find something in the text document. Be sure to have set English or Hebrew before this in order to type what you want to search for.
![[Ctrl]](../Images/Keyboard/KeyCtrl.gif) +
+![[A]](../Images/Keyboard/KeyA.gif) Will find and replace.
Will find and replace.
![[Ctrl]](../Images/Keyboard/KeyCtrl.gif) +
+![[L]](../Images/Keyboard/KeyL.gif) Will find again.
Will find again.
![[Ctrl]](../Images/Keyboard/KeyCtrl.gif) +
+![[Enter]](../Images/Keyboard/KeyEnter.gif) Will search in the word lists the word that has the cursor in the text document. In DOSBox please use the Right Control Key, the Left one is captured before the program in the simulator gets it.
Will search in the word lists the word that has the cursor in the text document. In DOSBox please use the Right Control Key, the Left one is captured before the program in the simulator gets it.
Note here you can make a partial selection of the word, with ![[F5]](../Images/Keyboard/KeyF5.gif) -
-![[F6]](../Images/Keyboard/KeyF6.gif) or
or ![[Shift]](../Images/Keyboard/KeyShift.gif) +
+![[Left]](../Images/Keyboard/KeyLf.gif)
![[Right]](../Images/Keyboard/KeyRg.gif) since Hebrew agglutinates words. For instance ה Ha which is the article THE, or ו Vav generally meaning AND or BUT; כ Kaf which may mean LIKE; ב Bet which may mean IN or WITH. You may want to leave them out of the search.
since Hebrew agglutinates words. For instance ה Ha which is the article THE, or ו Vav generally meaning AND or BUT; כ Kaf which may mean LIKE; ב Bet which may mean IN or WITH. You may want to leave them out of the search.
Also in declination of verbs, once you understand this you will be able to separate a VERBAL ROOT, to search for it the word list. In Spanish you may leave out the gender or number sensitive ending of nouns. In English you may do so with the number sensitive ending of nouns.
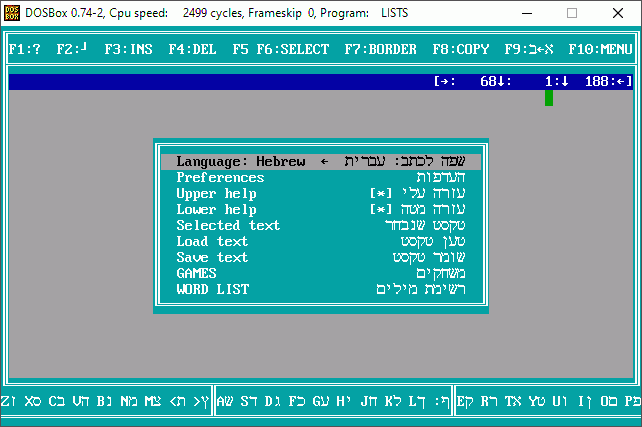
1.1 and 1.2 Language: Select language to type, for the western keyboard, you can choose from a variety. See ![[F1]](../Images/Keyboard/KeyF1.gif) in the 2.1 KEYS in the TEXT EDITOR section.
in the 2.1 KEYS in the TEXT EDITOR section.
1.3 Left Margin Will set the left margin at the current cursor location.
1.4 Right Margin Will set the right margin at the current cursor location.
2.1 Frame color: Will change the color of the frame for the text editor. Right mouse click in it does it too, and the location bar.
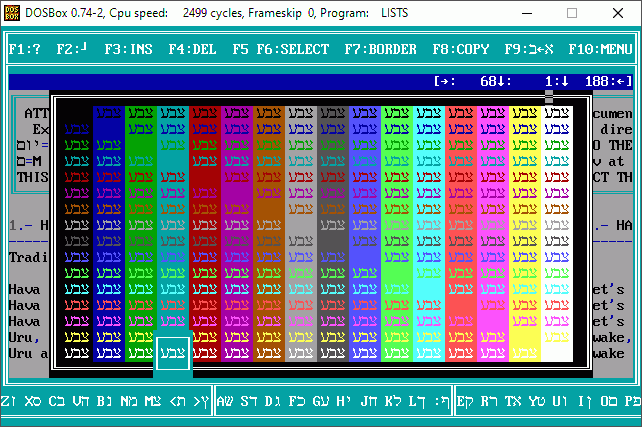
2.2 Text colors: Will change the colors of the text. The different colors for plain text, numbers, signs, borders, highlighted search, this same colors are also used in the Word List, and the Coincide many words game.
2.3 Ruler color: Location info var above the text. You can change between seeing numbers or a ruler by pressing ![[Tab]](../Images/Keyboard/KeyTab.gif) in the text editor.
in the text editor.
2.9 Initial colors: Will set all colors to initial default.
2.10 Load preferences: You can load a .PRF file from disk. Preferences include: All the colors, colors and movement settings in games background, the other Keyboard, the custom keyboard levels in the 10 Finger typing practice option, and the defined transliteration from the word list.
2.11 Save preferences: You can save your chosen colors, and other custom settings in a .PRF file in disk.
3.1 Function keys: Displays descriptions of the Function keys. This is the default setting for the upper help.
3.2 Keyboard layout: Displays the keyboard map, the right third shows the top row in the keyboard, the left third shows the bottom row of the keyboard. This is the default setting for the lower help.
3.3 Letter sounds: Displays approximate sound equivalences for all Hebrew letters.
3.4 .. 3.9 Vocabularies: The upper or lower help can display the words found in the word list, set here your prefered translation direction. An additional option will appear in this menu: The arrows mean the scrolling speed, press ![[Enter]](../Images/Keyboard/KeyEnter.gif) or click there to change it. You can also increase it by pressing
or click there to change it. You can also increase it by pressing ![[Shift]](../Images/Keyboard/KeyShift.gif) +
+![[F1]](../Images/Keyboard/KeyF1.gif) in the Text Editor.
in the Text Editor.
3.10 No help: Don't display any help on upper or lower help.
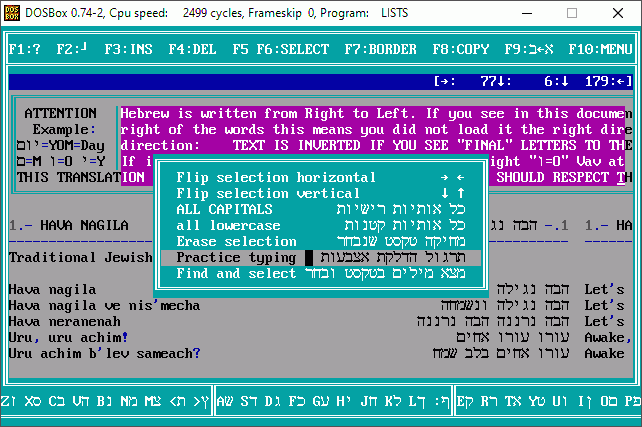
5.1 Flip selection Horizontal. Will flip right to left every letter of the selected text. Borders and lines will flip as well.
5.2 Flip selection Vertical. Will flip top to bottom every letter of the selected text. Borders and lines will flip as well.
5.3 ALL CAPITALS. As it describes. Remember this text editor doesn't have an undo option!
5.4 all lowercase
5.5 Erase selection
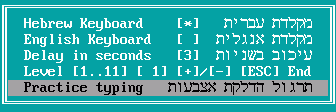
5.6.1 Hebrew keyboard
5.6.2 English keyboard
5.6.3 Delay in seconds: Set here how many seconds the computer will wait for you to type a character before it does it for you, a character you didn't type won't count towards a correct or incorrect typing. It can be 1 to 5.
5.6.4 Level: Here you will see a keyboard like the keyboard help, but the keys you are expected to type at the current game level will be highlighted.
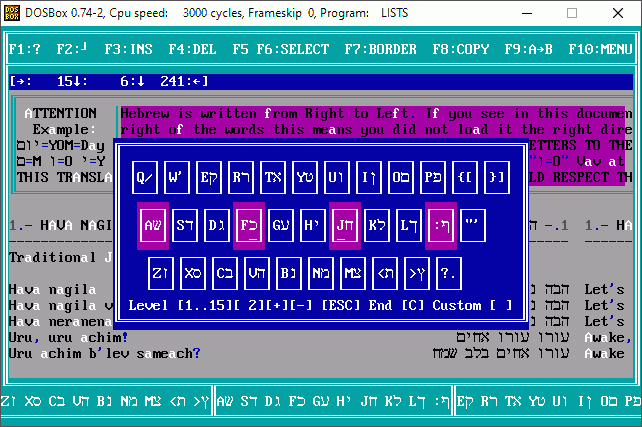
Press ![[+]](../Images/Keyboard/KeyPlus.gif) or
or ![[-]](../Images/Keyboard/KeyMinus.gif) to change the level.
to change the level. ![[Enter]](../Images/Keyboard/KeyEnter.gif) or
or ![[ESC]](../Images/Keyboard/KeyEsc.gif) when you are done selecting the level.
when you are done selecting the level.
![[C]](../Images/Keyboard/KeyC.gif) Typing practice Keyboard Levels settings: Here you can create you very own personal custom method to learn the keyboard. Maybe you want to learn all the keys for your pinkie fingers first, Move with
Typing practice Keyboard Levels settings: Here you can create you very own personal custom method to learn the keyboard. Maybe you want to learn all the keys for your pinkie fingers first, Move with ![[Up]](../Images/Keyboard/KeyUp.gif)
![[Dn]](../Images/Keyboard/KeyDn.gif)
![[Left]](../Images/Keyboard/KeyLf.gif) or
or ![[Right]](../Images/Keyboard/KeyRg.gif) to those [Q] [A] [Z] [P] [;] and [/] keys and write number 1 on each, simply move to other key when done.
to those [Q] [A] [Z] [P] [;] and [/] keys and write number 1 on each, simply move to other key when done.
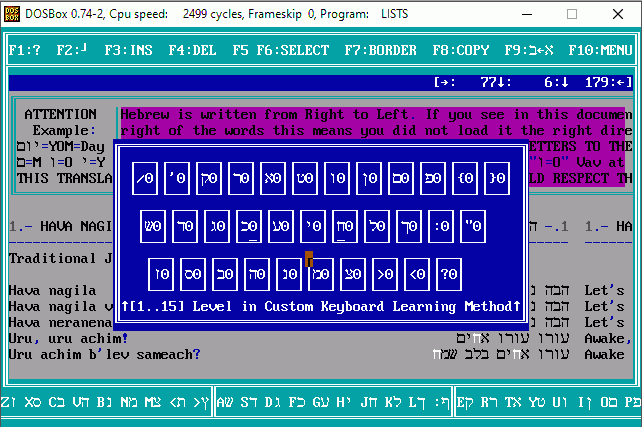
For the next level write number 2 probably index fingers...or you may prefer to do it by keyboard rows? Whatever is up to you, so set the keys with numbers 1 to 15. It is considered best practice learning to type based on finger-keys that way you can quickly type English or Hebrew on any keyboard. By blindly touching for the standard emboss that is located at ![[F]](../Images/Keyboard/KeyF.gif) and
and ![[J]](../Images/Keyboard/KeyJ.gif) , and typing all the other letters relative to that, you won't ever need to look at the English keyboard, nor Hebrew. This Custom method can be saved with all the preferences. See 2.11 Save preferences.
, and typing all the other letters relative to that, you won't ever need to look at the English keyboard, nor Hebrew. This Custom method can be saved with all the preferences. See 2.11 Save preferences.
5.6.5 Practice typing: When you made your selections get here. Will get you into the selected text at the first occurrence of a key to type, all the letters corresponding to keys to practice at the current level will be highlighted, will wait for you to type the key, if you don't type within the time set, the computer will do it for you.
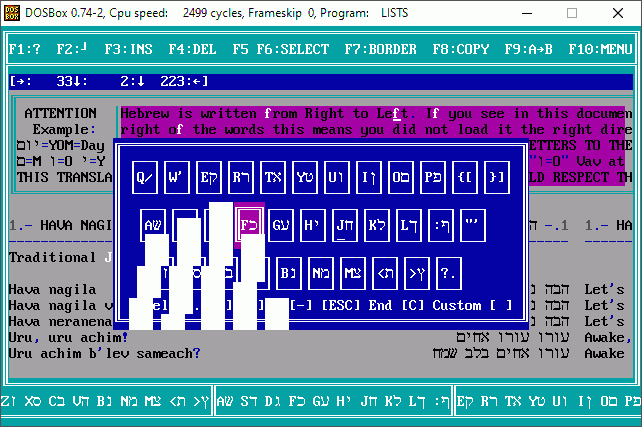
If there is not a single occurrence of a letter to practice in the selected text, an error will display, and won't proceed to practice.
Change level, or select other text with some keys you could practice. Press ![[ESC]](../Images/Keyboard/KeyEsc.gif) when done, a report of correct typing and errors will be displayed, and get back to the Typing practice menu where you can change the Level.
when done, a report of correct typing and errors will be displayed, and get back to the Typing practice menu where you can change the Level.
Trick for learning any keyboard: You can learn it by rows for instance type randomly all the keys in the middle row to almost fill a whole row. Press ![[Enter]](../Images/Keyboard/KeyEnter.gif) to get to the next row. Now don't look at the keyboard. The fact of the new for you alphabet not being there will be actually helpful. Place your index fingers at
to get to the next row. Now don't look at the keyboard. The fact of the new for you alphabet not being there will be actually helpful. Place your index fingers at ![[F]](../Images/Keyboard/KeyF.gif) and
and ![[J]](../Images/Keyboard/KeyJ.gif) , get there by touching, you will feel the emboss then keeping your fingers in those locations and using all your fingers, try to type underneath the same characters you randomly did in the row above them, you can do this several times. Once you learn them, do the top row of the keyboard, and bottom row of the keyboard. Make sure to finish practicing with some actual sentences.
, get there by touching, you will feel the emboss then keeping your fingers in those locations and using all your fingers, try to type underneath the same characters you randomly did in the row above them, you can do this several times. Once you learn them, do the top row of the keyboard, and bottom row of the keyboard. Make sure to finish practicing with some actual sentences.
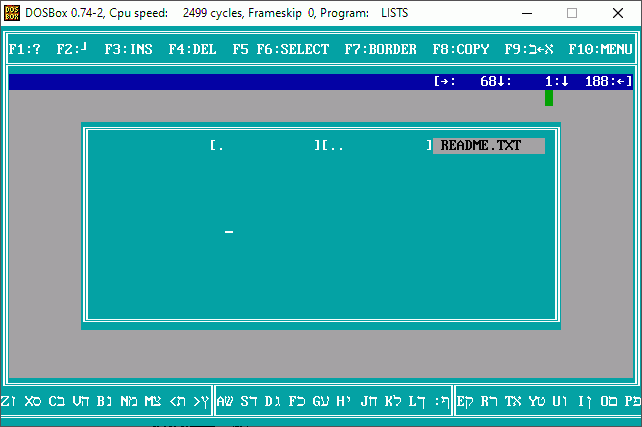
File information. How many rows and Encoding:

Note that any text document is saved in the same encoding it was loaded. You can find this in the text information. See ![[Shift]](../Images/Keyboard/KeyShift.gif)
![[F9]](../Images/Keyboard/KeyF9.gif) in the text editor. This program can load and save to different other Encoding. To do so get to the Text Editor Menu by pressing
in the text editor. This program can load and save to different other Encoding. To do so get to the Text Editor Menu by pressing ![[Shift]](../Images/Keyboard/KeyShift.gif)
![[F10]](../Images/Keyboard/KeyF10.gif) instead of
instead of ![[F10]](../Images/Keyboard/KeyF10.gif) will have the additional options: Load from Encoding, and Save to Encoding.
will have the additional options: Load from Encoding, and Save to Encoding.
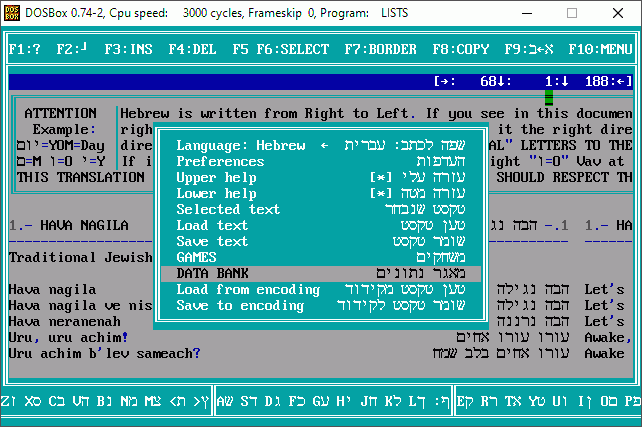
An Utf-8 text file:
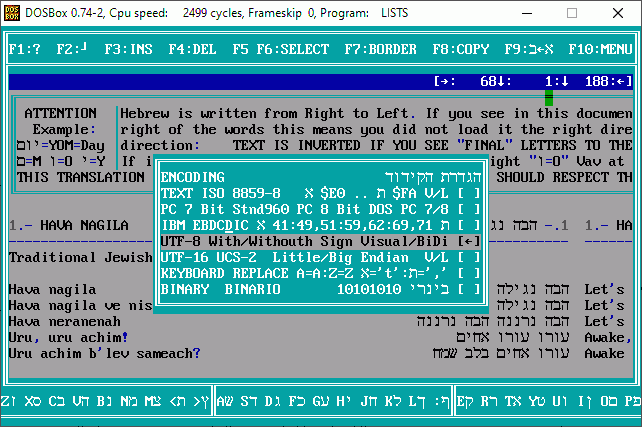
ISO 8859-8: It's like code page 437 or OEM, but includes Hebrew, Aleph is in $E0 or 224, and Tav in $FA or 250. Due to Hebrew is written from Right to Left it records in disk the last letters first and the first letters last in every row of text to display them correctly. This is called Visual.
ISO 8859-8-i: The -i means Implicit bidirectional. Every Hebrew section in every row is recorded in disk from begin to end, but displays in screen correctly. This is called Logical.
PC 7 Bit ASCII: Old Code. Aleph this at ', $60 Bet is at , $61 Gimel in b. $62.. It represents the Hebrew letters instead of the English lower-case letters. It is called also Standard 960.
PC 8 Bit ASCII IBM PC: Also called PC Code DOS Cp862 IBM862. Aleph is at $80 or decimal 128. Hebrew enabled CGA Hercules monitors used this encoding.
IBM EBCDIC: Is a property Code Page of International Business Machines Corp. Acronym of: Extended Binary Code Decimal Interchange Code. Has many CCSID Character Code Set Identification Number. er. In CCSID037 the Hebrew alphabet isn't continuous: Aleph is Decimal 41 to Tet 49, Yud is 51 to Samech 59, Ayin is 62 to Shin 69. And Tav is 71. It isn't used anymore.
Keyboard Replace: This is not an encoding, but there are some Hebrew Fonts that have the Hebrew Letters instead of Western Letters as they are placed in the keyboard. It's use is not recommended, unless to import from it.
UTF-16 UCS-2: It's a norm property of UNICODE. It represents each character with a 16 Bits or 2 Bytes Integer. Being able to represent more than 65000 different characters that include easily almost all the known alphabets. Aleph is at $05D0, decimal 1488. Tav is at $05EA, decimal 1514. It has two variants: Little Endian and Big Endian. This in reference to the order in which a number of 16 Bits or 2 Bytes is recorded in Disk, if the byte more significant first or later. Includes a signature at the beginning of file: $FE $FF or $FF $FE.
UTF-8 With/Without Signature/ Bidi: It may include a signature at the beginning of the file $EF $BB $BF can be Bidirectional or not.
Binary: It is not an encoding. It displays a file byte by byte.
We describied their use in the Lessons part. However using games you get to define the selection yourself.
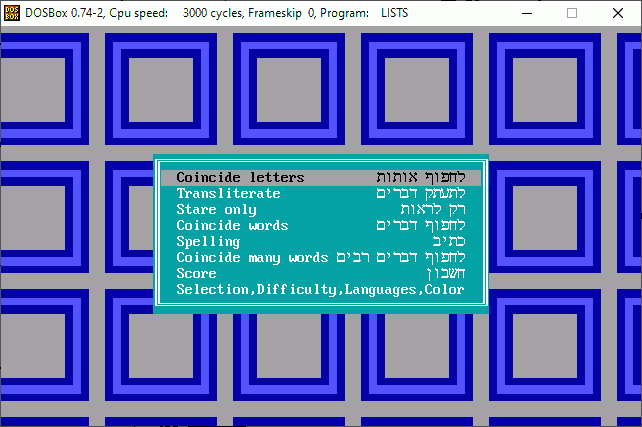

Transliteration can be turned off in the Transliteration Menu
The Coincide Letters game has a Menu:
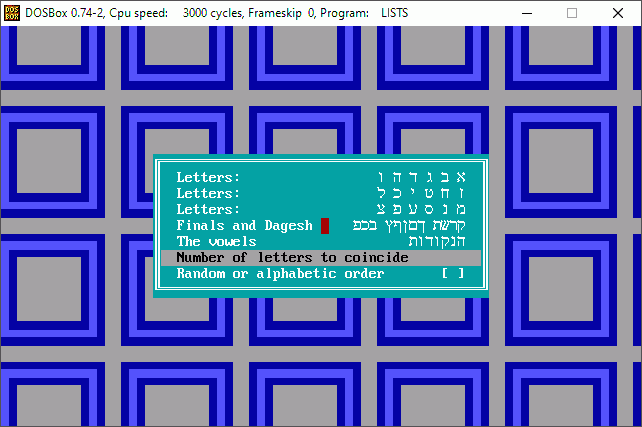
1.1 Letters: א ב ג ד ה ו Will coincide the first six letters of the Hebrew Aleph-Bet. א Aleph is actually silent, a bit of a guttural stop, so it transliterates to '. ב Beth sounds like V or B we assume is a V here. ג Gimel sounds like G, ה He very much like English H, at end of words is slightly inspired. ו Vav as a consonant is a V, sometimes could be vowel U or O, now we assume is a V; for this reason the V letter will only leave the list of letters to match when both ב and ו are coincided.
1.2 Letters: ז ח ט י כ ל They kind of sound: ז Zain like Z. ח Chet like CH. ט Tet, like T. י Yud like Y, sometimes is vowel I. כ Chaf, like KH, like K when it has a dagesh. ל Lamed like L.
1.3 Letters: מ נ ס ע פ צ This: מ Mem like M. נ Nun like N. ס Samech like S. ע Ayin is silent, a bit of more of a guttural stop than Aleph, we transliterate it as a ". פ Fe like F, when it has a dagesh פּ sounds like P. צ Tzadi like Tz.
1.4 Letters: ק ר ש ת ך ם ן ף ץ ב ג ד Finals and Dagesh: ק Khof like K. ר Reish like R. ש Shin like SH or S; when it's unknown if is a SH or a S we transliterate it like Sh. And ת Tav like T. 5 of the 22 Hebrew letters look different when they are at the end of a word IE ך=כ=CH ם=מ=M ן=נ=N ף=פ=F. ץ=צ=TZ. Bet בּ with dagesh is B. כּ CHaf with dagesh is K. Fe פּ with dagesh is P.
1.5 The dots: The Nikkudot. Hebrew has 15 vowel sounds, they can still be transliterated as A, E, I, O, U, or EI, there is a difference in the pronunciation for long and short vowels. Hebrew has generally the stress in the last syllable
1.6 Number of letters to coincide: Will coincide as many letters as the number of coincidences or difficulty is set in the Games Configuration Menu.
1.7 Random or alphabetic order [*]: If you know the equivalences set this to make the matching interesting.
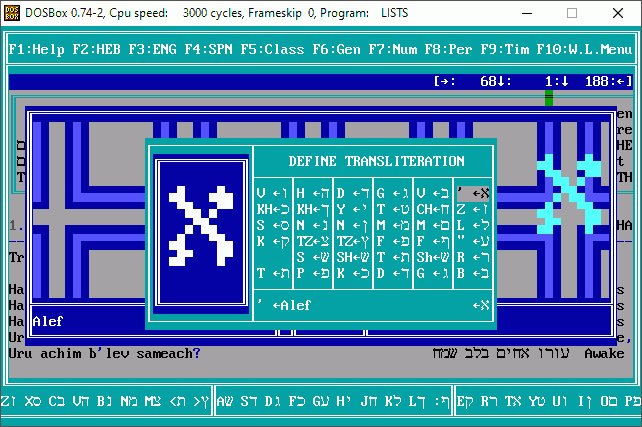
Historically and under more strict transliteration ג without a Dagesh transliterates to GH meaning a soft sound. ד without a Dagesh transliterates to DH, and finally ת without a Dagesh transliterates to TH. You can set this Up if you wish in the Define Transiteration option in the Word List. This letters are the same you get in the Letters to paint and cut in this website.We recommend to pay more attention to native pronunciation than transliteration, since it is just an aid in the learning process, in fact only at the start of the learning process, once you can pronounce Hebrew by seeing the Hebrew letters and points you don't need transliteration anymore, you left behind this part of learning. And don't get used to the nikud or dots, they are not there in everyday written Hebrew.
Note the guttural stops א Aleph and ע Ayin are less noticeable than in the Arabic language, some make them unnoticeable or even possibly don't pronounce them at all.
Using ![[Up]](../Images/Keyboard/KeyUp.gif) or
or ![[Dn]](../Images/Keyboard/KeyDn.gif) move to the Hebrew or English rows and select equivalent letters by moving with
move to the Hebrew or English rows and select equivalent letters by moving with ![[Left]](../Images/Keyboard/KeyLf.gif) or
or ![[Right]](../Images/Keyboard/KeyRg.gif) then press
then press ![[Enter]](../Images/Keyboard/KeyEnter.gif) or
or ![[Space]](../Images/Keyboard/KeySpc.gif) , if your selection is correct they will slide to the middle and get out from the list. You can also use the mouse to drag and drop, or click instead. If you want to hasten your movement, hold
, if your selection is correct they will slide to the middle and get out from the list. You can also use the mouse to drag and drop, or click instead. If you want to hasten your movement, hold ![[Shift]](../Images/Keyboard/KeyShift.gif) while pressing
while pressing ![[Left]](../Images/Keyboard/KeyLf.gif) or
or ![[Right]](../Images/Keyboard/KeyRg.gif) or dragging a letter with the mouse to skip the scrolling.
or dragging a letter with the mouse to skip the scrolling.

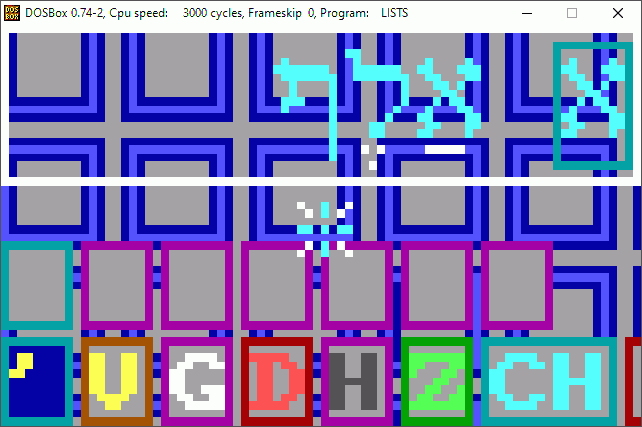
There will be three rows in the screen. The top row is the Hebrew word, words or sentence to be transliterated. The middle row is a set of empty rectangles where each transliterated letter will be filled. The bottom row has all the English letters in Aleph-Beth order of transliteration. From this third row you choose the English equivalent of the Hebrew letter that we are transliterating. Use ![[Up]](../Images/Keyboard/KeyUp.gif) to chose which Hebrew letter you wish to transliterate, as you move along the middle row with
to chose which Hebrew letter you wish to transliterate, as you move along the middle row with ![[Left]](../Images/Keyboard/KeyLf.gif) or
or ![[Right]](../Images/Keyboard/KeyRg.gif) , the top row will also highlight the Hebrew letter or vowel corresponding to that space. Use
, the top row will also highlight the Hebrew letter or vowel corresponding to that space. Use ![[Dn]](../Images/Keyboard/KeyDn.gif) to go to the English letters, chose from them with
to go to the English letters, chose from them with ![[Left]](../Images/Keyboard/KeyLf.gif) or
or ![[Right]](../Images/Keyboard/KeyRg.gif) the English equivalent of the Hebrew letter that we are transliterating. Press then
the English equivalent of the Hebrew letter that we are transliterating. Press then ![[Enter]](../Images/Keyboard/KeyEnter.gif) or
or ![[Space]](../Images/Keyboard/KeySpc.gif) . Also you can drag an English letter and drop it over the appropriate Hebrew letter or vowel symbol, or drag a Hebrew letter or Nikud and drop it over the appropriate English letter. If you prefer may type the transliteration as well, caps or lowercase won't matter. Press
. Also you can drag an English letter and drop it over the appropriate Hebrew letter or vowel symbol, or drag a Hebrew letter or Nikud and drop it over the appropriate English letter. If you prefer may type the transliteration as well, caps or lowercase won't matter. Press ![[PgUp]](../Images/Keyboard/KeyPgUp.gif) or
or ![[PgDn]](../Images/Keyboard/KeyPgDn.gif) to get to other words to transliterate. Press
to get to other words to transliterate. Press ![[ESC]](../Images/Keyboard/KeyEsc.gif) to Exit.
to Exit.

Select any animation, Check the Clock [*] if you want to see it as a background, selecting this option three times will show only the clock.

Press ![[PgUp]](../Images/Keyboard/KeyPgUp.gif) or
or ![[PgDn]](../Images/Keyboard/KeyPgDn.gif) to see the previous or next word. The select words can be selected by: Selection criteria, Block, or Vocabulary. See: Games>Configuration>Selection, Word List>Selection, and Text Editor>Selected Text>Find and Select. This selection affects all games.
to see the previous or next word. The select words can be selected by: Selection criteria, Block, or Vocabulary. See: Games>Configuration>Selection, Word List>Selection, and Text Editor>Selected Text>Find and Select. This selection affects all games. ![[ESC]](../Images/Keyboard/KeyEsc.gif) will exit.
will exit.

Using ![[Up]](../Images/Keyboard/KeyUp.gif) or
or ![[Dn]](../Images/Keyboard/KeyDn.gif) move to the Hebrew or English rows, and select equivalent words by moving
move to the Hebrew or English rows, and select equivalent words by moving ![[Left]](../Images/Keyboard/KeyLf.gif) or
or ![[Right]](../Images/Keyboard/KeyRg.gif) in both languages then press
in both languages then press ![[Enter]](../Images/Keyboard/KeyEnter.gif) or
or ![[Space]](../Images/Keyboard/KeySpc.gif) If they coincide, will slide to the middle and leave the list. You can also use a mouse click instead of pressing
If they coincide, will slide to the middle and leave the list. You can also use a mouse click instead of pressing ![[Enter]](../Images/Keyboard/KeyEnter.gif) or
or ![[Space]](../Images/Keyboard/KeySpc.gif) . If you want to hasten your movement, hold
. If you want to hasten your movement, hold ![[Shift]](../Images/Keyboard/KeyShift.gif) while pressing
while pressing ![[Left]](../Images/Keyboard/KeyLf.gif) or
or ![[Right]](../Images/Keyboard/KeyRg.gif) just like in Lessons 1 to 5 or the Coinciding Letters Game.
just like in Lessons 1 to 5 or the Coinciding Letters Game.

This game displays in the top row several "?" that need to be replaced with the correct Hebrew Letters.

The translated word will be displayed once scrolling in the middle of the screen. The bottom row has all the Hebrew Letters to choose from to replace the "?" in the top row. Go to the Word to be spelled with ![[Up]](../Images/Keyboard/KeyUp.gif) , move along the several "?" with
, move along the several "?" with ![[Left]](../Images/Keyboard/KeyLf.gif) or
or ![[Right]](../Images/Keyboard/KeyRg.gif) to replace them with the appropriate Hebrew letter choosing it from the bottom row, going there with
to replace them with the appropriate Hebrew letter choosing it from the bottom row, going there with ![[Down]](../Images/Keyboard/KeyDn.gif) , and choosing any particular letter by moving with
, and choosing any particular letter by moving with ![[Left]](../Images/Keyboard/KeyLf.gif) or
or ![[Right]](../Images/Keyboard/KeyRg.gif) . Holding
. Holding ![[Shift]](../Images/Keyboard/KeyShift.gif) will skip the scrolling to hasten your search. Mouse dragging and dropping works too. Holding
will skip the scrolling to hasten your search. Mouse dragging and dropping works too. Holding ![[Shift]](../Images/Keyboard/KeyShift.gif) skips scrolling hastening the mouse as well.
skips scrolling hastening the mouse as well.
Like in Transliterating you can also type, fill all the "?", move along towards the left by pressing ![[Space]](../Images/Keyboard/KeySpc.gif) ,, the keyboard will work like Israeli keyboard. If you wish you can spell also English or Spanish, to do so select it as top language in the Games Configuration Menu.
,, the keyboard will work like Israeli keyboard. If you wish you can spell also English or Spanish, to do so select it as top language in the Games Configuration Menu.

Move between both lists with ![[Left]](../Images/Keyboard/KeyLf.gif) or
or ![[Right]](../Images/Keyboard/KeyRg.gif) , then seek for equivalents with
, then seek for equivalents with ![[Up]](../Images/Keyboard/KeyUp.gif) or
or ![[Dn]](../Images/Keyboard/KeyDn.gif) . When you find equivalent words press then
. When you find equivalent words press then ![[Enter]](../Images/Keyboard/KeyEnter.gif) or
or ![[Space]](../Images/Keyboard/KeySpc.gif) . When you get to a more advanced level and choose to have coincidences in the 60s, 70s, or even 100 you may want to learn also the Israeli Keyboard so you can start typing the word you remember to hasten your search for a translation: As you start to write, you will be taken to the closest match, the matching letters will highlight, and you can press
. When you get to a more advanced level and choose to have coincidences in the 60s, 70s, or even 100 you may want to learn also the Israeli Keyboard so you can start typing the word you remember to hasten your search for a translation: As you start to write, you will be taken to the closest match, the matching letters will highlight, and you can press ![[Up]](../Images/Keyboard/KeyUp.gif) or
or ![[Dn]](../Images/Keyboard/KeyDn.gif) to get to the next compliant word, your search will be significantly faster, while helping you on keyboard practice. Pressing
to get to the next compliant word, your search will be significantly faster, while helping you on keyboard practice. Pressing ![[Back Space]](../Images/Keyboard/KeyBckSpc.gif) will delete the last letter to search. Pressing
will delete the last letter to search. Pressing ![[Del]](../Images/Keyboard/KeyDel.gif) will clear the search. Moving to the other language list will clear the search too. When you are in the English words the keyboard will be an English keyboard, when you are in the Hebrew words the keyboard will be an Israeli keyboard. While having a search if
will clear the search. Moving to the other language list will clear the search too. When you are in the English words the keyboard will be an English keyboard, when you are in the Hebrew words the keyboard will be an Israeli keyboard. While having a search if ![[Up]](../Images/Keyboard/KeyUp.gif) or
or ![[Dn]](../Images/Keyboard/KeyDn.gif) advance only one row and won't take you to the next compliant word this means there are no more compliant words up or down from where you are in the list.
advance only one row and won't take you to the next compliant word this means there are no more compliant words up or down from where you are in the list.

Number of correct and wrong answers, time

and compares them in a scale.

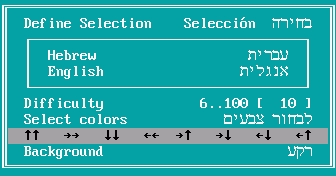
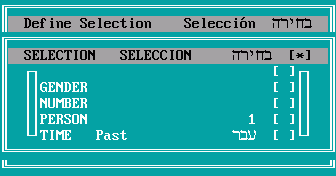
8.1 Define Selection: Set a selection criteria for the words to play with. Set the Selection [ ] to [*], will look like this, choose here the Class, Gender, Number, if a Noun Person, and if a verb time criteria for selection. Generally Class will suffice.
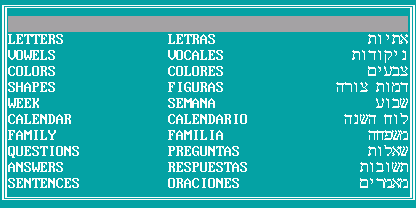
The classes:
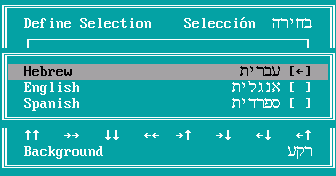
8.2 Languages: Select here the language you want to learn at the top of the rectangle, the language you want to learn it from at the bottom of the rectangle, they must be different.
8.3 Difficulty: Set here the number of coincidences. 100 is the largest value allowed.
8.4 Select colors: Select colors for everything in games. This also does the Word List view of the big letters.
8.5 Movement: Select here an increment for vertical and horizontal movement of the background. Set them to 0 to stay put.
8.6 Background: Select something. If you want to cancel the background simply select again what is already selected, it will be canceled. This colors and settings can be saved to disk. See 2.11: Text Editor Menu>Preferences>Save Preferences
The word list includes every word in the website. In fact the word list in the website had been generated from the data bank of this program's word list.
From the Text Editor press ![[F10]](../Images/Keyboard/KeyF10.gif) to go the Text Editor Menu then select Word List with
to go the Text Editor Menu then select Word List with ![[Dn]](../Images/Keyboard/KeyDn.gif) ,
, ![[End]](../Images/Keyboard/KeyEnd.gif) and
and ![[Enter]](../Images/Keyboard/KeyEnter.gif) , or just number
, or just number ![[9]](../Images/Keyboard/Key9.gif) since it will be the ninth option in that menu. You can also press
since it will be the ninth option in that menu. You can also press ![[ESC]](../Images/Keyboard/KeyEsc.gif) to get out of the Text Editor, back to the Main Menu, and there select Word List with
to get out of the Text Editor, back to the Main Menu, and there select Word List with ![[Dn]](../Images/Keyboard/KeyDn.gif) and
and ![[Enter]](../Images/Keyboard/KeyEnter.gif) or number
or number ![[4]](../Images/Keyboard/Key4.gif) .
.
From the Text Editor press ![[Ctrl]](../Images/Keyboard/KeyCtrl.gif) +
+ ![[Enter]](../Images/Keyboard/KeyEnter.gif) with the cursor over a word you wish searched for in the word list, or the right button of the mouse over it as well. In DOSBox make sure to use the right
with the cursor over a word you wish searched for in the word list, or the right button of the mouse over it as well. In DOSBox make sure to use the right ![[Ctrl]](../Images/Keyboard/KeyCtrl.gif) key.
key.
For some searches it may be useful to select part of a word, do it with the block selection: ![[F5]](../Images/Keyboard/KeyF5.gif) and
and ![[F6]](../Images/Keyboard/KeyF6.gif) or
or ![[Shift]](../Images/Keyboard/KeyShift.gif) +
+![[Left]](../Images/Keyboard/KeyLf.gif) or
or ![[Rg]](../Images/Keyboard/KeyRg.gif) , or the mouse. For instance this happens in Hebrew with Ha which is the article THE, or Vav that generally means AND or But; Kaf which may mean LIKE; Bet which may mean IN or WITH, also in the declination of verbs, once you understand this you will be able to separate a VERBAL ROOT, to search for it in a dictionary. In Spanish you may discard the gender or number sensitive ending of nouns. In English you may discard the number sensitive ending of nouns.
, or the mouse. For instance this happens in Hebrew with Ha which is the article THE, or Vav that generally means AND or But; Kaf which may mean LIKE; Bet which may mean IN or WITH, also in the declination of verbs, once you understand this you will be able to separate a VERBAL ROOT, to search for it in a dictionary. In Spanish you may discard the gender or number sensitive ending of nouns. In English you may discard the number sensitive ending of nouns.
This is the Keyboard in the Word List:
![[F1]](../Images/Keyboard/KeyF1.gif) Brings up the Help.
Brings up the Help.
![[F3]](../Images/Keyboard/KeyF3.gif) Will search words in Spanish.
Will search words in Spanish.
![[F4]](../Images/Keyboard/KeyF4.gif) Will search words in English.
Will search words in English.
![[Shift]](../Images/Keyboard/KeyShift.gif) +
+![[F2]](../Images/Keyboard/KeyF2.gif) Will modify the word in Hebrew.
Will modify the word in Hebrew.
![[Shift]](../Images/Keyboard/KeyShift.gif) +
+![[F3]](../Images/Keyboard/KeyF3.gif) Will modify the word in English.
Will modify the word in English.
![[Shift]](../Images/Keyboard/KeyShift.gif) +
+![[F4]](../Images/Keyboard/KeyF4.gif) Will modify the word in Spanish.
Will modify the word in Spanish.
![[F5]](../Images/Keyboard/KeyF5.gif) Shows or modifies the class of the word.
Shows or modifies the class of the word.
![[F6]](../Images/Keyboard/KeyF6.gif) Shows or modifies Gender
Shows or modifies Gender
![[F7]](../Images/Keyboard/KeyF7.gif) Shows or modifies Number
Shows or modifies Number
![[F8]](../Images/Keyboard/KeyF8.gif) Shows or modifies Person
Shows or modifies Person
![[F9]](../Images/Keyboard/KeyF9.gif) Shows or modifies Time
Shows or modifies Time
![[Enter]](../Images/Keyboard/KeyEnter.gif) Will RECORD the modifications to disk. A "RECORDED" message will be displayed.
Will RECORD the modifications to disk. A "RECORDED" message will be displayed.
![[Tab]](../Images/Keyboard/KeyTab.gif) Changes the view of the word list: Big Letters to see the Nikud and Transliteration, or List to see the class and more words.
Changes the view of the word list: Big Letters to see the Nikud and Transliteration, or List to see the class and more words.
![[Space]](../Images/Keyboard/KeySpc.gif) Brings the Selections Menu. Here is set how the Word List is sorted. See Word List Selections Menu
Brings the Selections Menu. Here is set how the Word List is sorted. See Word List Selections Menu
![[F10]](../Images/Keyboard/KeyF10.gif) Brings up the Word List Menu
Brings up the Word List Menu

Remember: Here, as well as in the text editor, you can always [Click] the Keyboard Layout help at the bottom of the screen to type a letter. Also pressing ![[Ctrl]](../Images/Keyboard/KeyCtrl.gif) +
+![[PgDn]](../Images/Keyboard/KeyPgDn.gif) will take you there to do it with
will take you there to do it with ![[Left]](../Images/Keyboard/KeyLf.gif) or
or ![[Rg]](../Images/Keyboard/KeyRg.gif) and
and ![[Enter]](../Images/Keyboard/KeyEnter.gif) . In the Search Window just
. In the Search Window just ![[PgDn]](../Images/Keyboard/KeyPgDn.gif) is enough to take you to the bottom row. Please don't get used to this, is meant as help at the very start only. You should learn to actually type. See: Practice typing.
is enough to take you to the bottom row. Please don't get used to this, is meant as help at the very start only. You should learn to actually type. See: Practice typing.
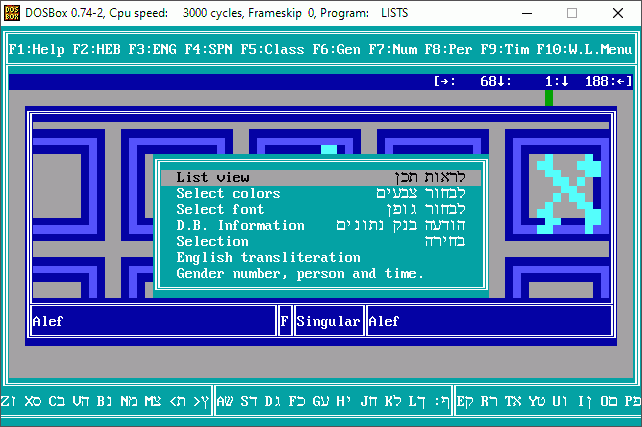
1 Big letter or List view. Will change the view mode of the word list.
2 Select Colors: Colors in the word list and games.
3 Select Font: Select the font for the Big letter view.
4 Data Bank Information: Will display the number of Records and entries of all word lists, current locations, and number of records compliant of selection.
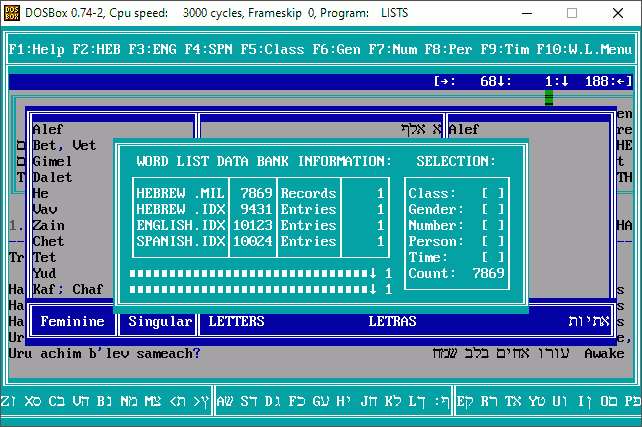
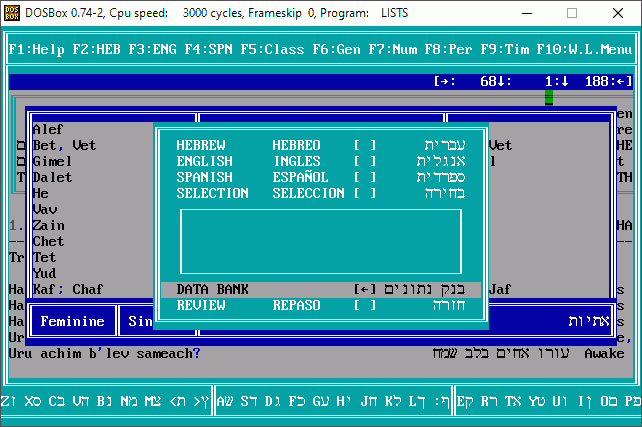
The Selection [*] option makes use or not to use a selection, to see only the words that accomplish the selection. The Data Bank [ ] option will display the Data Bank which is sorted by Class and then Hebrew. There you can directly select a block with ![[Shift]](../Images/Keyboard/KeyShift.gif) +
+![[Up]](../Images/Keyboard/KeyUp.gif) or
or ![[Dn]](../Images/Keyboard/KeyDn.gif) , and will use those to play/study in games. The Review [*] option will hide the translations in the Big Letter view in the Word List, to practice recalling meanings. Press any key to see the translation. To deactivate this press
, and will use those to play/study in games. The Review [*] option will hide the translations in the Big Letter view in the Word List, to practice recalling meanings. Press any key to see the translation. To deactivate this press ![[Space]](../Images/Keyboard/KeySpc.gif) , to get to this menu and un-check the Review [ ] option.
, to get to this menu and un-check the Review [ ] option.
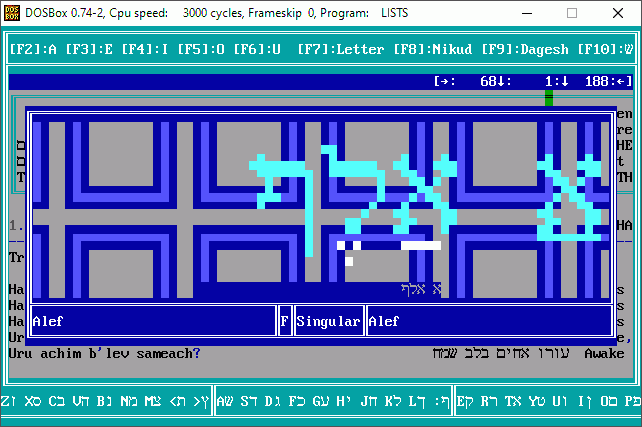
Editing Hebrew the Keyboard works like this:
![[F1]](../Images/Keyboard/KeyF1.gif) Will display the Help.
Will display the Help.
![[F2]](../Images/Keyboard/KeyF2.gif) Will place on the letter at cursor nikud which sounds like A: Patach, Kamats Gadol, Chataf Patach. Press again and again until you get the "A" sounding vowel you need.
Will place on the letter at cursor nikud which sounds like A: Patach, Kamats Gadol, Chataf Patach. Press again and again until you get the "A" sounding vowel you need.
![[F3]](../Images/Keyboard/KeyF3.gif) Will place on the letter at cursor nikud which sounds like "E": Shva, Segol, Chataf Segol.
Will place on the letter at cursor nikud which sounds like "E": Shva, Segol, Chataf Segol.
![[F4]](../Images/Keyboard/KeyF4.gif) Nikud that sounds "I" or "AE" Chirik, Tsere, or no nikud.
Nikud that sounds "I" or "AE" Chirik, Tsere, or no nikud.
![[F5]](../Images/Keyboard/KeyF5.gif) Nikud that sounds "O" Cholam, Kamats Katan, Chataf Kamats.
Nikud that sounds "O" Cholam, Kamats Katan, Chataf Kamats.
![[F6]](../Images/Keyboard/KeyF6.gif) Nikud that sounds "U" Shuruk, Kubuts. Kubuts only will apply to a ו Vav at the cursor location.
Nikud that sounds "U" Shuruk, Kubuts. Kubuts only will apply to a ו Vav at the cursor location.
![[F7]](../Images/Keyboard/KeyF7.gif) Letter: Will bring up the Keyboard Help.
Letter: Will bring up the Keyboard Help.
![[F8]](../Images/Keyboard/KeyF8.gif) Nikud: Will bring up the Nikud menu.
Nikud: Will bring up the Nikud menu.
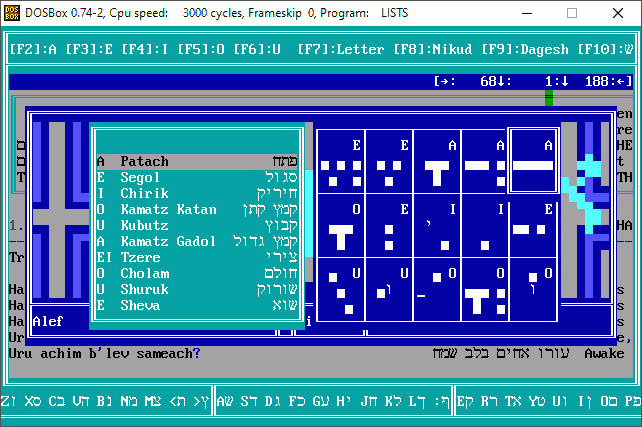
![[F9]](../Images/Keyboard/KeyF9.gif) Dagesh: Will place or remove a dagesh in the letter where the cursor is at.
Dagesh: Will place or remove a dagesh in the letter where the cursor is at.
![[F10]](../Images/Keyboard/KeyF10.gif) Will bring the Sin dot, Shin dot, or remove it if the letter where the cursor is located is a ש Shin.
Will bring the Sin dot, Shin dot, or remove it if the letter where the cursor is located is a ש Shin.
You may also use the Nikud in the numbers, just type the key. See Israeli Keyboard,
![[Enter]](../Images/Keyboard/KeyEnter.gif) Will save the changes of the Hebrew word in memory. If you have done the needed changes in the translations and classifications press
Will save the changes of the Hebrew word in memory. If you have done the needed changes in the translations and classifications press ![[Enter]](../Images/Keyboard/KeyEnter.gif) AGAIN to RECORD the changes to disk a "RECORDED" message will be displayed.
AGAIN to RECORD the changes to disk a "RECORDED" message will be displayed.
![[Shift]](../Images/Keyboard/KeyShift.gif) +
+![[F10]](../Images/Keyboard/KeyF10.gif) from the Text Editor, It will have instead of the Word List, the Data Bank option:
from the Text Editor, It will have instead of the Word List, the Data Bank option:
That's all. We hope this is helpful.
5 Exit. Will check once if you really want to quit the program.

The program is provided as is. It's adequacy for a particular purpose is not guaranteed. Copying is allowed as long it's not modified. It's free and should not be sold.
Download Lists.ZIP